Saturday, December 31, 2011

2012!

Hi All!

HAPPY PRE NEW YEAR!

Hope everyone is gonna have a great night! We will try to stay up to watch the ball drop! Key word "Try".

This one was so fun to do! Stuff I used. Base coat is Pure Ice - Black Rage. The back ground is (Wet n Wild - Silvivor, Saved by the Blue, SaGreena the teenage Witch, Hallucinate), NYC -  Purple Pizzazz, Pure Ice - New Lilac, Nina Ultra Pro - Rasberri Sparkle.Empire Drink and lettering NYC - State Blue, Wet n Wild - Lavender Pearlescent, and acrylic.

I wanted the 2012 to have the backdrop of all the colors of the fireworks. But I didn't want the fireworks to over take the numbers. So I dabbed the colors on the base then added one light coat of glitter to add to the sparkle. I did this yesterday and missed the sun. I just couldn't get the colors without the sun. So I waited till this morning. I was so worried I would screw them up before pictures. I have that kind of luck. If I had the pictures they would have been fine. haha I was on eggshells all night! It was hard in the sun to get the colors but I hope you can see them! They are so pretty! I wish camera's would catch what we see! I hope you like this one.

HAPPY NEW YEAR!


Friday, December 30, 2011

Wild Thing!

Hi All!

It's Friday! Hope your all ready for the weekend! So, tomorrow I'll have an New Year mani for you guys! Today I thought I would brighten things up a little! 
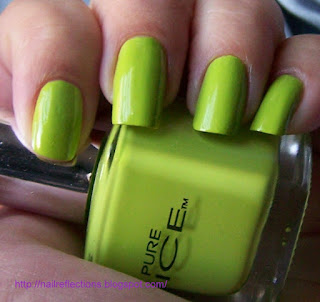
For that spring feel here is Pure Ice - Wild Thing! This is just a beautiful yellow green! Crazy thing, is that this is a thick polish. Normally Pure Ice is more on the thin sheer side, not this one. The first coat was horrible! It was streaky and dragged. I hated it! Second coat made me forgive it! I love this color it look so good alone due to how bright it is. It has that Notice me look, because you can not miss it! This color makes me think of little green frogs! Without the ick factor! I hope you guys like!


Thursday, December 29, 2011

Cracking Sparkles!

Hi All!

Almost 2012! I'm not really excited about it. It is kinda just number i'll screw up for the next month. Other then at its just another day. I don't try to change things I hate about me on January 1st. I don't see it as this magical day that will finally change my life! And a month later making excuses why That Magical Day didn't work for me! If I was gonna pick a day for a new beginning it would be my birthday! You know the day it all actually began for me!

So the pottery wheel! Was fun, was messy, was evil!  HA out of a block of clay we made nothing but mud! It was a Pretty pretty messy mud! It takes practice. And the kids wheel only has one speed which is really to fast for a kid learning. So he would build it up, get the mouth open and deep. Then he would start working on the sides and it would crack. hehe and start over. We did this till there was not much clay left! But plenty of mud. He looked like a clay figure himself by the time we were done. Maybe the next block will be better!

Today, I have a Green Crackle from Pastel -704 that I got from the awesome Esra . I know a lot of people are over the Crackle thing. Not me I love it. I love finding different pretty ways to wear it. 
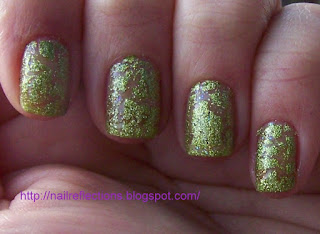
So I really like Crackle over just a clear base coat! But this time I used Wet n Wild - Kaleidoscope as a thin one coat for the base. It was a bit textured from the glitter. I was thinking how would crackle work on an non smooth surface. So I put a clear coat on all my nails but my ring finger. Leaving it with the glitter texture. Then added a nice thick coat of the crackle. Which was very easy with this formula of crackle!

So in The fist set of pictures I have no top coat on. Excuse the mess! I wanted to show how you can still see the nail with a nice hint of glitter between the cracks. This crackle cracked really well. But you can see on the ring finger how the crackle didn't work so well.  It did crack but not as well with the smooth nails. It was worth the try thou. The second set of pictures have a top coat and it do brings the nails to life and the glitter sparkles so pretty! It was hard to catch with my camera and the sun not being its normal happy self. But I really love this look! I hope you all like it!


Wednesday, December 28, 2011

Kiss me here and here!!

Hi All! 

Hope everyone is having a great middle of the week! Sometime I wonder how I find time in the day to do everything! Now that Christmas is over I'm  just as busy with playing and setting up all the new stuff my son was lucky enough to get this year! Today is (don't laugh =) ) The Pottery wheel! I for see in my future it being sprayed everywhere when he just can't help himself and puts it on high! So to make my life a bit easier today I have a swatch for you!
This is Pure Ice - Kiss me here! I love this grey! this is 3 coats. The formula is really thin but as always builds well and look gorgeous! And it is so smooth and shiny on its own. I just love this color. I hope you like it to!


Tuesday, December 27, 2011

Polished Manicure!

Hi All!

I hope Everyone had the very best holiday ever! Mine was awesome! Enjoyed the downtime with family!You will see I cut my nails down!! Don't panic! I did this, do to my son getting a violin. So to help him, I needed shorter nails for as long as needed. I might seem sad about the nails but I'm so happy about my son learning the violin! Things we do for our kids right!

The next most awesome thing is that I Won Esra  from Oje Sihirbazı (Wizard of Polish) 100 follower Giveaway! And they came on December 24th. How cool was that! They are all so beautiful!! 
Thank you Esra!


Here are the beauties!

Claire's 48 (Grey)
Claire's 72 (Pink
Claire's 46 (Teal)
Claire's 14 (purple)
Rimmel 185 Mocha Fever 
Rimmel 198 Azure
Pastel 704 (Crackle polish) 
Flormar U06 (From Miracle Colors Collection)
Golden Rose 05 (Matte Nail Lacquer red)
Golden Rose 10 (Matte Nail Lacquer blue)

This is the simple French main I did with Golden Rose 5 and 10. Then added a glitter top coat of Wet n Wild - Kaleidoscope. I love this look. The dark red and blue are so pretty ! The light coat of glitter just makes it stand out! I hope you all like!


Thursday, December 22, 2011

Present Tutorial!

Hi All!

I hope everyone is having a relaxing day! Only 3 days left til Christmas!


Today Emm from Circular Insanity asked me to do a tutorial! So, this is for you Emm! Well no one said they liked the green present so I remove it to do this.  So, please don't mind the scuffing on the older nails. Shopping it a rough business!!

Step 1. Pick your colors. You will need 4. Your Base / Topcoat, your base color, your bow color and complimenting color of the bow. 
I used Pure Ice - Platinum for the base polish. I like shiny colors for the presents. But any will do.
Wet n Wild - Lavender Pearlescent for the bow color.   
A light Pink Acrylic for the complimentary color. 
I went lighter so you can see it more clearly. I would normally use either one shade lighter or darker. Unless I used white or black.


 Step 2. Paint your base coat and let it dry. You could also stamp on a pattern is you want your wrapping paper to have a design. Then I always put on a thin topcoat. to help with any bleeding that may or may not happen. 


Step 3. Paint the complimentary color on like a cross. Let is dry. Doesn't take long.  You can click on the picture to get a bigger look.


 Step 4. Then paint you bow color on top of the complimentary color. Try to follow the edges as closely as you can. This doesn't have to be perfect. Just don't leave gaps undone.


 Step 5. With the complimentary color put you bow knot on with a little oval square dot. You can click on the picture to get a bigger look.


 Step 6. With the complimentary color just slowly build out the bows. Its V's out from the knot and then round the corners . Build slowly you can add more. Taking it away is a bit harder.  You can click on the picture to get a bigger look. 


Step 7. Add the bow streamers. Just start from the bottom of the knot pull down a little and flip one right and one left. I don't do these to big because I don't want to take up the whole present. You can click on the picture to get a bigger look.


 Step 8. With your bow color, your gonna fill in the bow knot but leave a small amount of complimentary color showing on the edges. Then trace a thin line from the knot to the end of the top of bow ears not letting the complimentary color show. Then down the side and around the bottom BUT letting a thin edge of the complimentary color show on the outside edge. Then fill in the bow ears BUT leave a line of complimentary color at the top to show where the bow opens. You can click on the picture to get a bigger look.


 Step 9. Fill in the bow streamers, pick which leg you want to be the top and leave a line of complimentary colors show from the knot down the end of the leg on the inside. Then fill in the other leg starting after the line and down. If you accidentally cover the line up just take the complimentary color and repaint the line thin as possible. let dry.


 Step 10. Add a thick topcoat and let it dry. Don't worry about the roughness of the paint the topcoat will smooth out the look You can click on the picture to get a bigger look.


 Here is the final look !  I hope this help you all. I also hope I didn't talk to much during this for you! 


Wednesday, December 21, 2011

Presents for You!

Hi All!

Is everyone READY! 4 day's till Christmas! This has got to be a quickie today! I'm sure we all have bunches of stuff to do. And i want to catch up on everyone's blogs ! At least while they don't know i'm missing!!
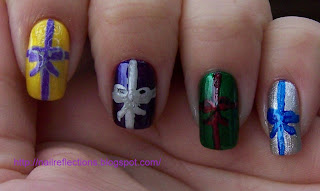
This is presents! And i used Wet n Wild - The Wonder Yellow, SaGreena the Teenage Witch, Silvivor, Eggplant frost.And the only one not Wet n Wild is Nina Ultra Pro - Bloodi Mari. and a few acrylics! Hope you like them!!